Camunda BPMN process definitions are simultaneously a graphical and textual representation of an executable workflow. I find the technology very interesting as it works both a visual communication tool and as a low code rapid development system. It excels at long running operations and has a focus on reliability and observability. The supporting tooling that allows querying running processes both graphically and/or via REST APIs.
The tool I built here for evaluation purposes touches on many BPMN concepts and would serve as a useful introduction if you would like to learn more about a different way of producing cross service applications.
Background: Less Code Is More
I have a hypothesis that writing a load of code is no longer the best path for developing internal tools. Generally, there are so many polish products out there now, that even if you spend a fortune, you won't get very good results. It's not about execution ability or resourcing. Basically a product company can refine feedback from many customers, and thus can figure out the right level of abstraction. This leads to a feedback driven development process that is strictly superior when compared to a single customer internal tool. Internal tools overfit their organization and then become resistant to the inevitable change.
So now I think the best path to great tooling is stitching together existing products under a common UX. Every company has its own set of regulatory and historical context. No product company can fully cater to every company's product context (e.g. choice of CMS), infact, product companies should focus exclusively on their domain niche. So to create the best performing suite of tools for your employees, you need to plumb separate best-in-class tools together. If you can create a seamless experience across the suite, your employees will be happy, productive and ultimately provide competitive advantage for your organization.
To get to this nirvana, you need technologies that combine. You want products that expose APIs, understand URLs, and offer machine readable specifications (OpenAPI, gRPC). You also need glue to stitch them together. This article is about trying out Camunda BPMN (Business Process Modeling Notation) as the glue to build a non-trivial and useful cross service application.
A Tool: Blog Support Delivered through Slack
My employer, Futurice, has a selection of internal tools and policies which are broadly typical for a modern technology company, namely:
- The organization would like employees to write blogs but it's not mandatory.
- Company culture values impact, feedback and data driven reasoning.
- Access to the Google Analytics data is protected, so there is a barrier for content authors to see how well a blog does, and anyway, that tool is complicated.
- Everybody in the organization uses Slack.
- The organization uses G Suite for identity.
Thus I felt I could add value to the company by delivering Google Analytics data to blog authors via the UX of choice, Slack. This would add a feedback loop from blog publishing to impact, which would hopefully help people write better in the long term.
Furthermore, by generating a standard content report, we could make comparisons across content pieces easier, and, as the report was a stable URL, it provides an easily shared artifact for inclusion at performance review time.
In the end, I used the following technologies:
- Zapier to poll our RSS blog feed
- Camunda BPMN to orchestrate
- Google Data Studio to summarize and expose Google Analytics Data
- Slack to communicate with employees
- Google Secret Manager to hold the secrets
This kind of application is in an interesting area. It is small, most of the complexity is in 3rd party software, it can provide genuine value, but is not really the kind of thing a product company can deliver, being too specific to the organizational context. It was a great application to see how well Camunda BPMN can work as a low code integration glue. It's a good choice as it is probably more complex than what you could do with Zapier, and also, I felt I led to a defensible story for secret storage.
System Architecture
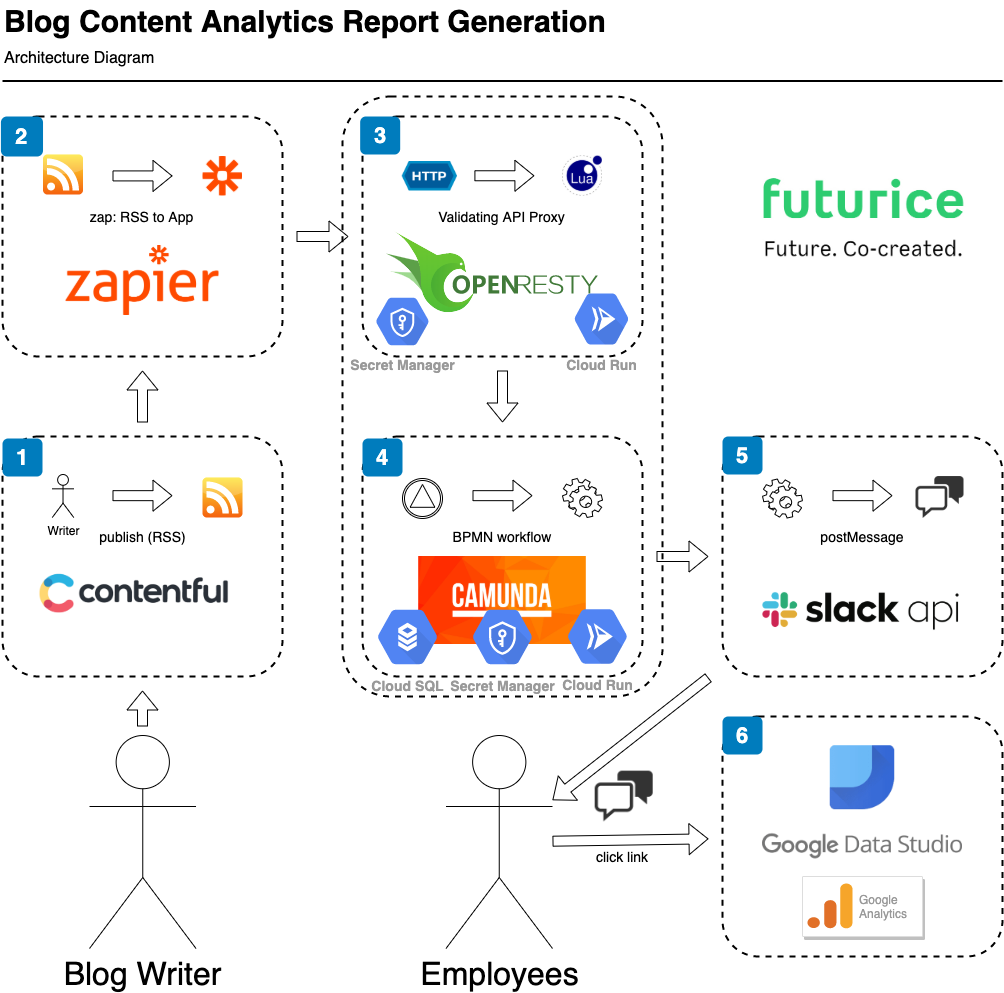
- The process starts when a blog writer submits an article to our CMS (Contentful). Posting an article updating the website and an RSS feed.
- A Zap hosted on Zapier is triggered by RSS and evokes a custom app action, which is ultimately an authenticated call to a proxy.
- Our proxy, hosted on Google Cloud Run, validates the inbound request, and forwards to our internal Camunda installation. Necessary secrets are accessed using Google Secret Manager
- Our vanilla Camunda docker installation is hosted on Google Cloud Run and persists to Google Cloud SQL. It is able to run BPMN business workflows uploaded via a REST API. It is notified of new blog posts via a BPMN signal (also implemented as a REST API). Our workflow retrieves a slack application secret and makes calls to the Slack API under a bot identity.
- By calling the Slack API, we add messages to the Futurice Slack workspace. This can be read by relevant Futurice employees, and includes clickable dynamically generated URLs.
- For our workflow, we have a URL that takes the user to a Google Data Studio Content Report for each article written to the Futurice blog. Data Studio summarizes data drawn from Google Analytics and exposes it with different access permissions.
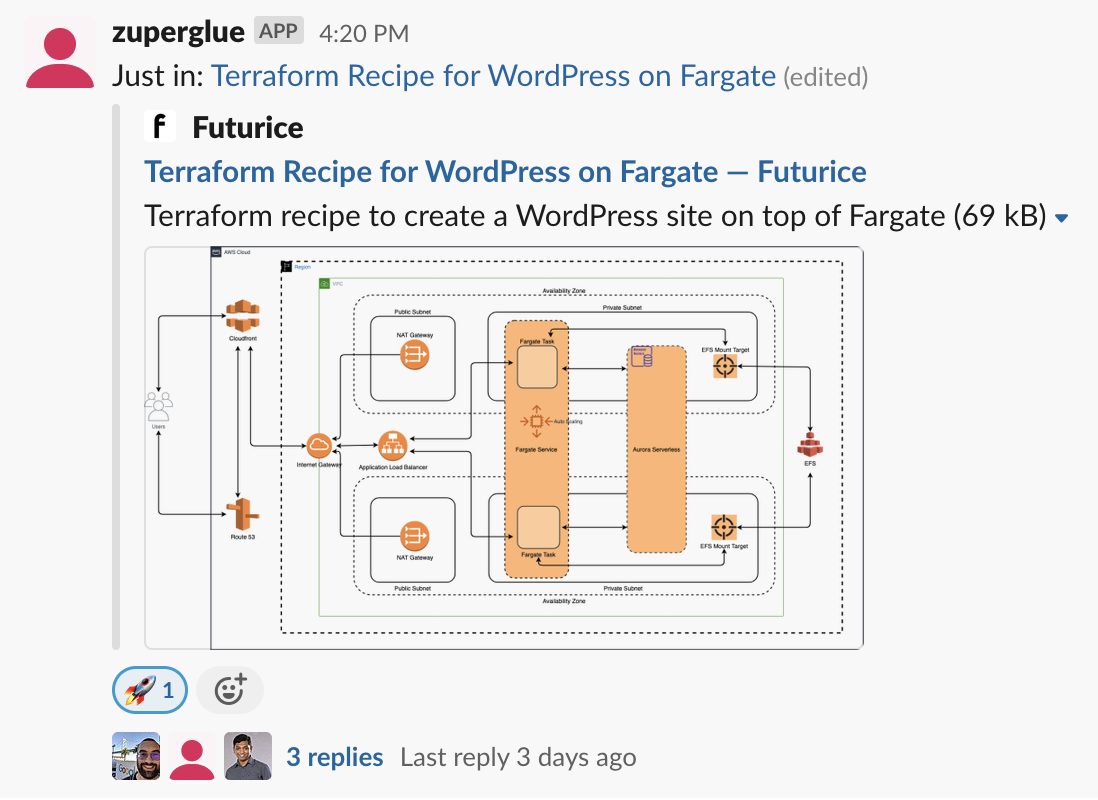
In this article, I will concentrate on how the application was expressed as a BPMN configuration (step 4). If you are interested in how Camunda was serverlessly hosted on Google Cloud Platform, check out serverless-camunda-terraform-recipe-using-cloud-run-and-cloud-sql. If you are interested in how the Proxy was setup, including integration with Slack and Zapier, have a look at openresty-a-swiss-army-proxy-for-serverless.
This blog post is quite large and detailed. If you want to skip the minutiae I suggest heading straight to The Finished Application near the end.
Zapier: RSS to BPMN Signal
To detect when a new blog is published, we start with a common website feature: RSS. It's a very useful technology for event driven automation over the internet. An RSS feed provides an XML summary of new content which can be polled and parsed fairly easily. That said, monitoring poll loops is not so fun so we delegate this task to Zapier and their ops team. (outsourcing RSS polling is a good example of pushing operation complexity to specialized 3rd parties, which I think is the future of development).
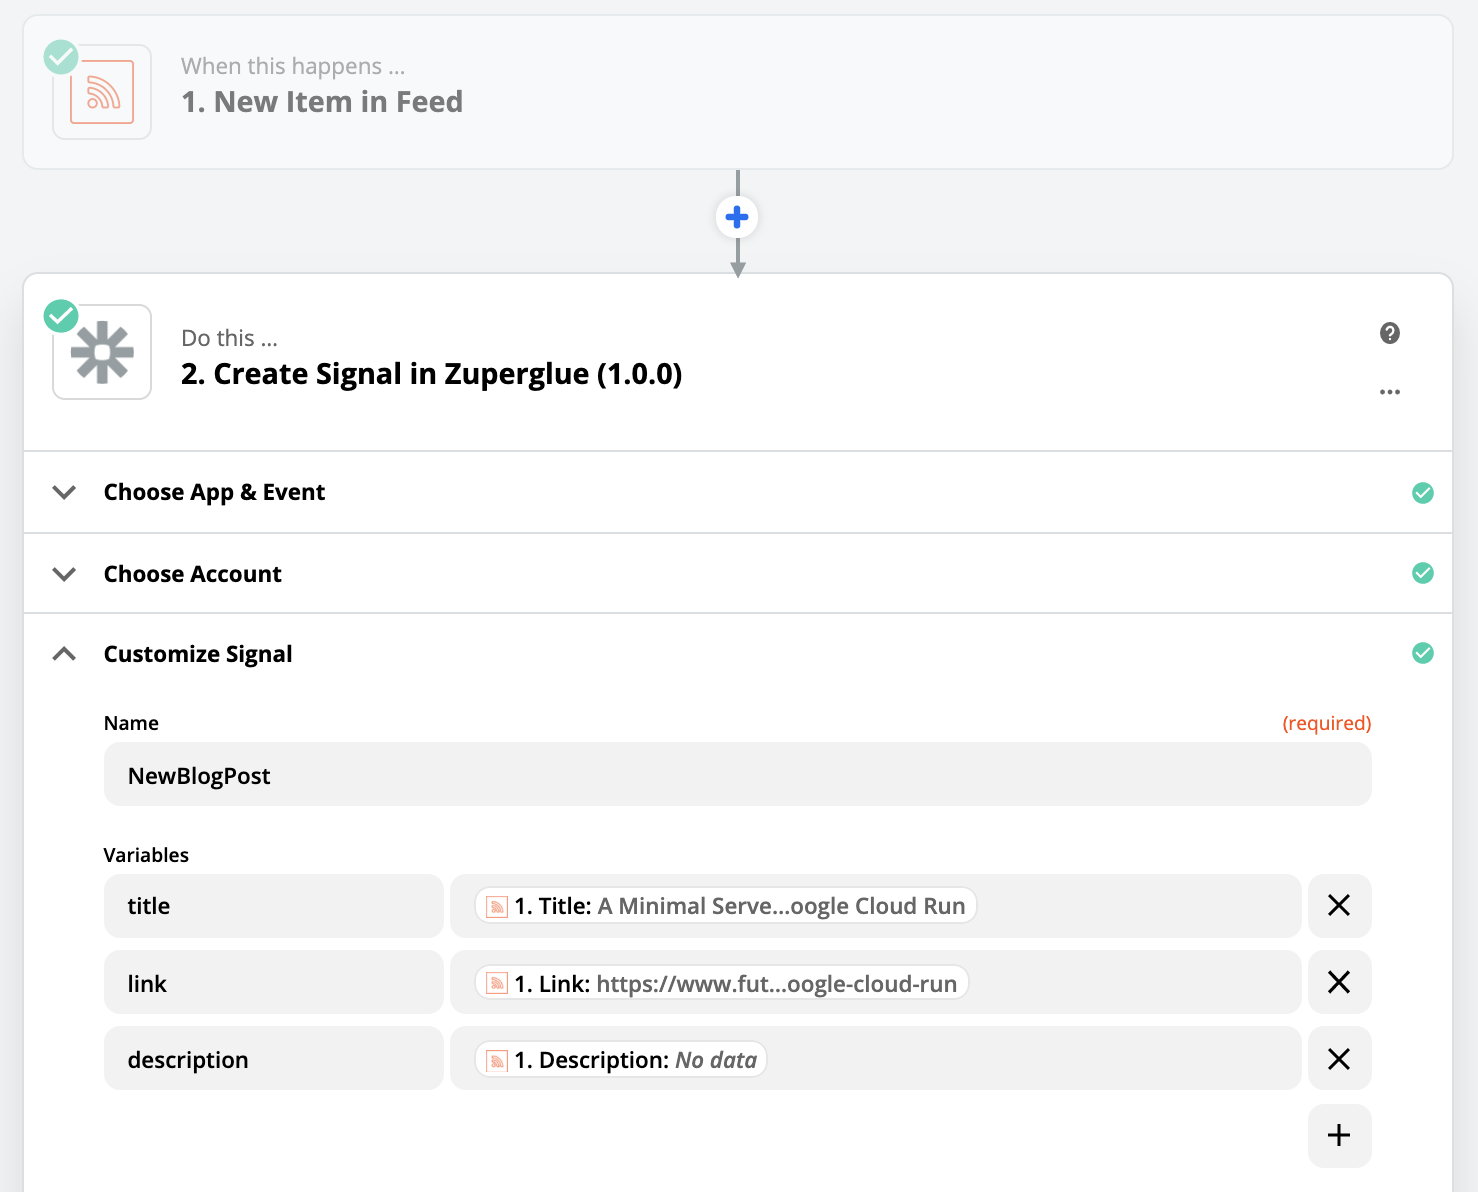
Zapier lets you write simple rules that do some action on an event. In our case, when a new blog is published we want it to trigger a BPMN business workflow. We opted to create a custom internal Zapier app for this, as a basic webhook did not seem to provide the security I wanted. Custom apps can be secured via Oauth 2.0 which is nicer. To my surprise, custom apps are also allowed in the free tier, so the Zapier monthly cost is $0, and we didn't have to host a poll loop!
When a new RSS entry appears, our Zap posts a signal to the Camunda REST API, with the title and link as parameters. (see the Camunda docs - Throw a Signal)
Camunda BPMN: Preparation Workflow Signal to Signal
Before the main long running content workflow process is started, we run it through a small preparatory workflow step (full source).
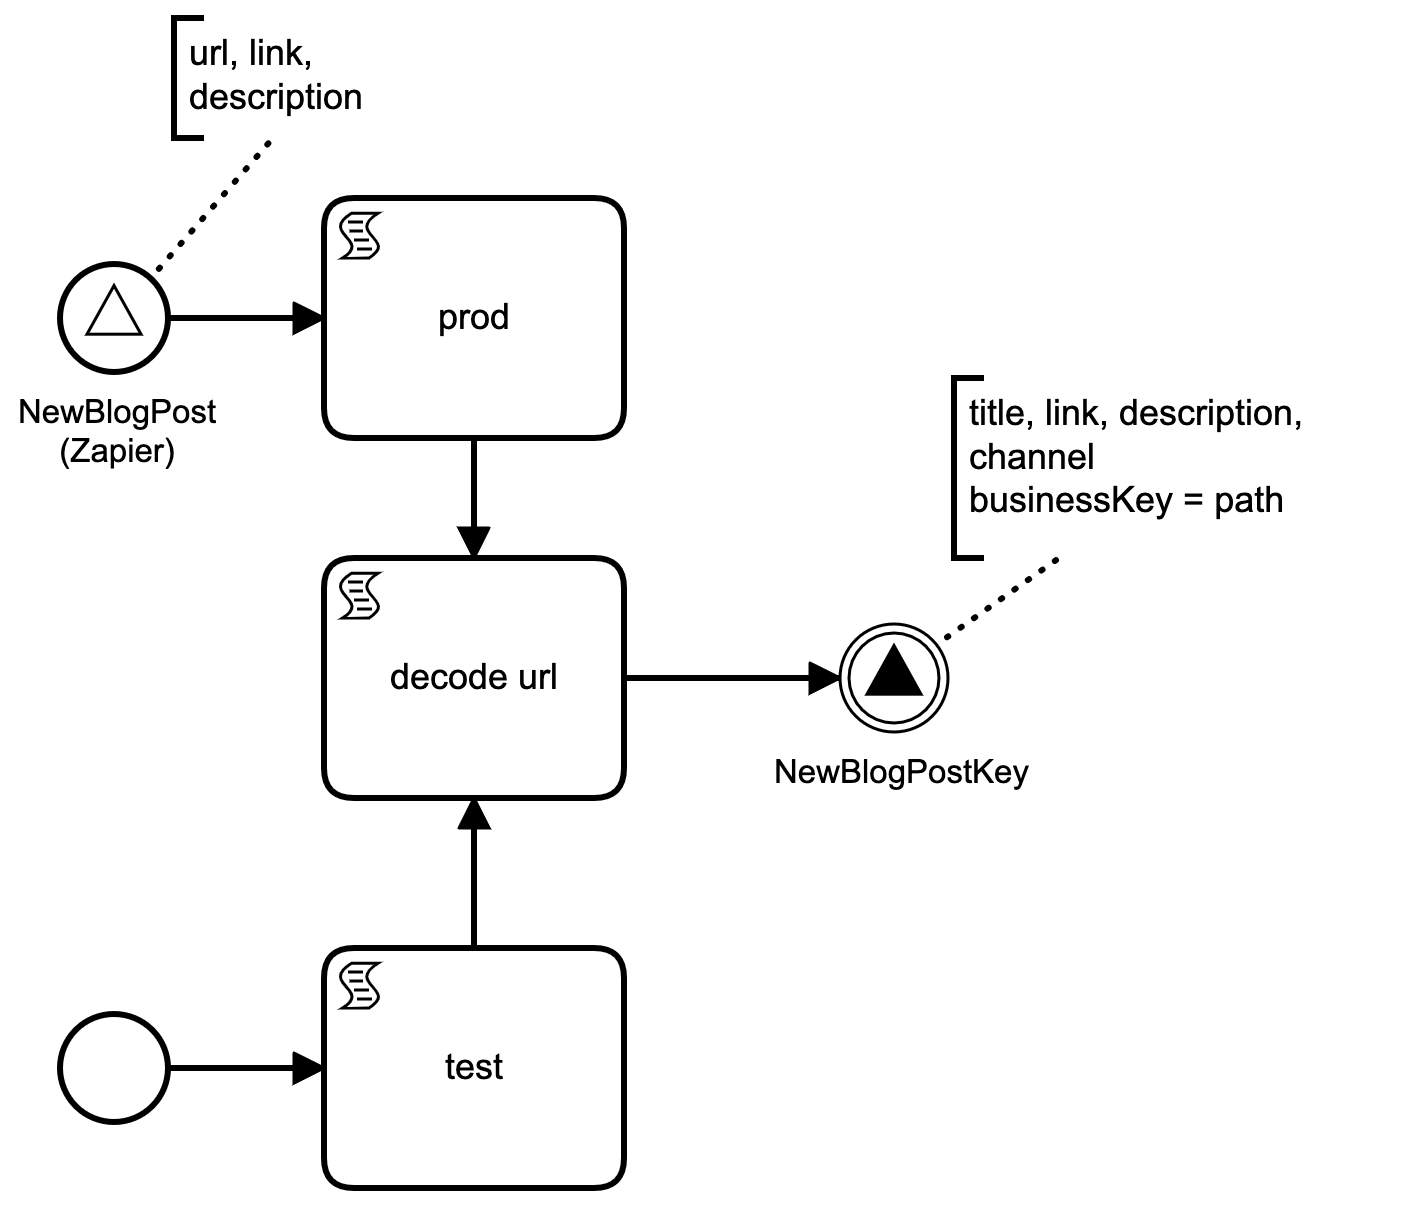
The purpose of the preparatory step is to: 1. set the business key, 2. provide an additional entrance point for manually triggering it, and 3. set the downstream slack channel to be used. The workflow takes a signal trigger by Zapier, and rethrows a very similar signal. A signal in BPMN is a broadcast event.
With Camunda you can give a running process a "business key", which serves as a primary index. This has performance implications when processes try to communicate, but more importantly, a business key gives a running process a useful name. This is extremely useful for debugging in production. As our workflows revolve around blog content, which is served on a unique URL, we use the URI as the businessKey (e.g. blog/from-office-to-space). Thus, in the preparatory workflow, we extract the path in a 2 line script (decode url).
url = new java.net.URL(execution.getVariable("link"));
execution.setVariable("path", url.getPath())
With the path variable now set, we can throw another signal, but this time with the business key set to the value of the path variable (NewBlogPostKey).
While it is possible to set the business key in Zapier through the Camunda signal REST API, I felt this was an abstraction leak and wanted to keep Zapier implementation simple.
As mentioned, the point of setting the business key is so to improve the ergonomics of Camunda production monitoring. Camunda has this amazing monitoring tool called Cockpit which shows what processes are running for a given process definition and version. By setting the business key it is trivial to figure out the purpose of an individual process, i.e. what content is the process about
As well as setting the business key, the other interesting feature of this preparatory process is the inclusion of a manual start event wired to a "test" script task. In production things are signal triggered, but by including a non-signal start event I can manually invoke a test process straight from the Camunda process drawing tool Modeler. The test script allows me to manually set the title and link variables and then kick off the normal blog post workflow. Thus, I can skip using Zapier which is useful for testing, or for manual backfill.
Because spamming employees with messages is extremely annoying in an organization. The eagle eyed reader will notice the output signal includes an additional variable "channel". This informs the downstream workflow which Slack room to post to. Thus when testing, I post messages exclusively to a private channel in Slack. This reminds me of dependancy injection.
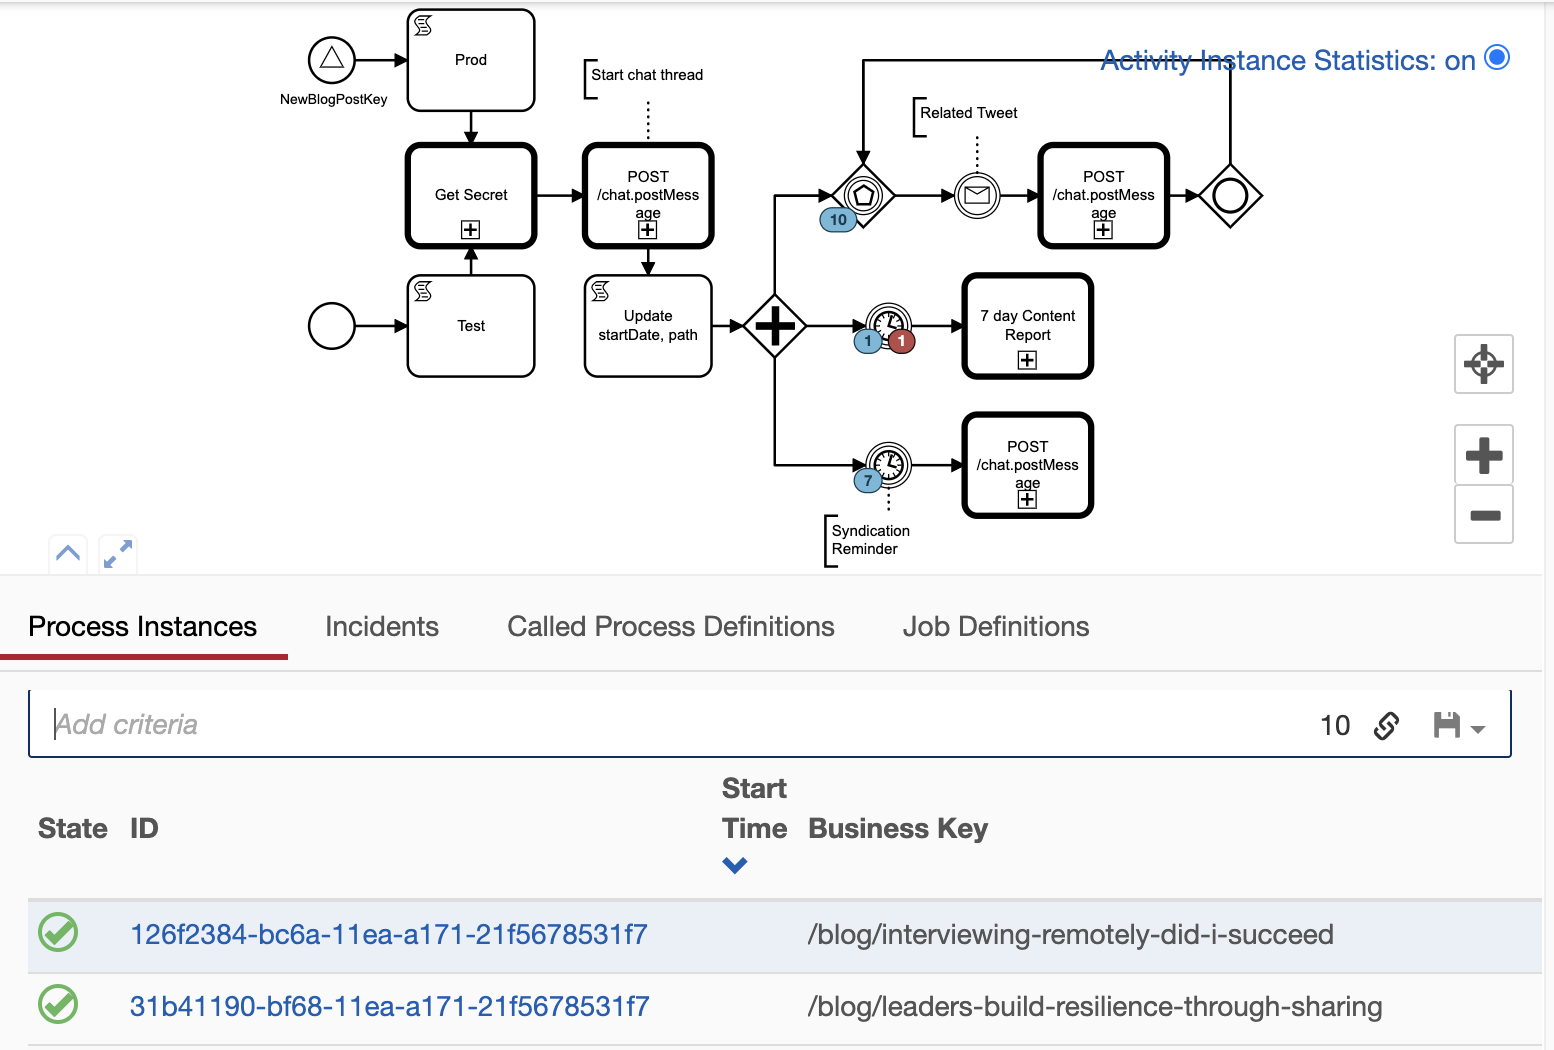
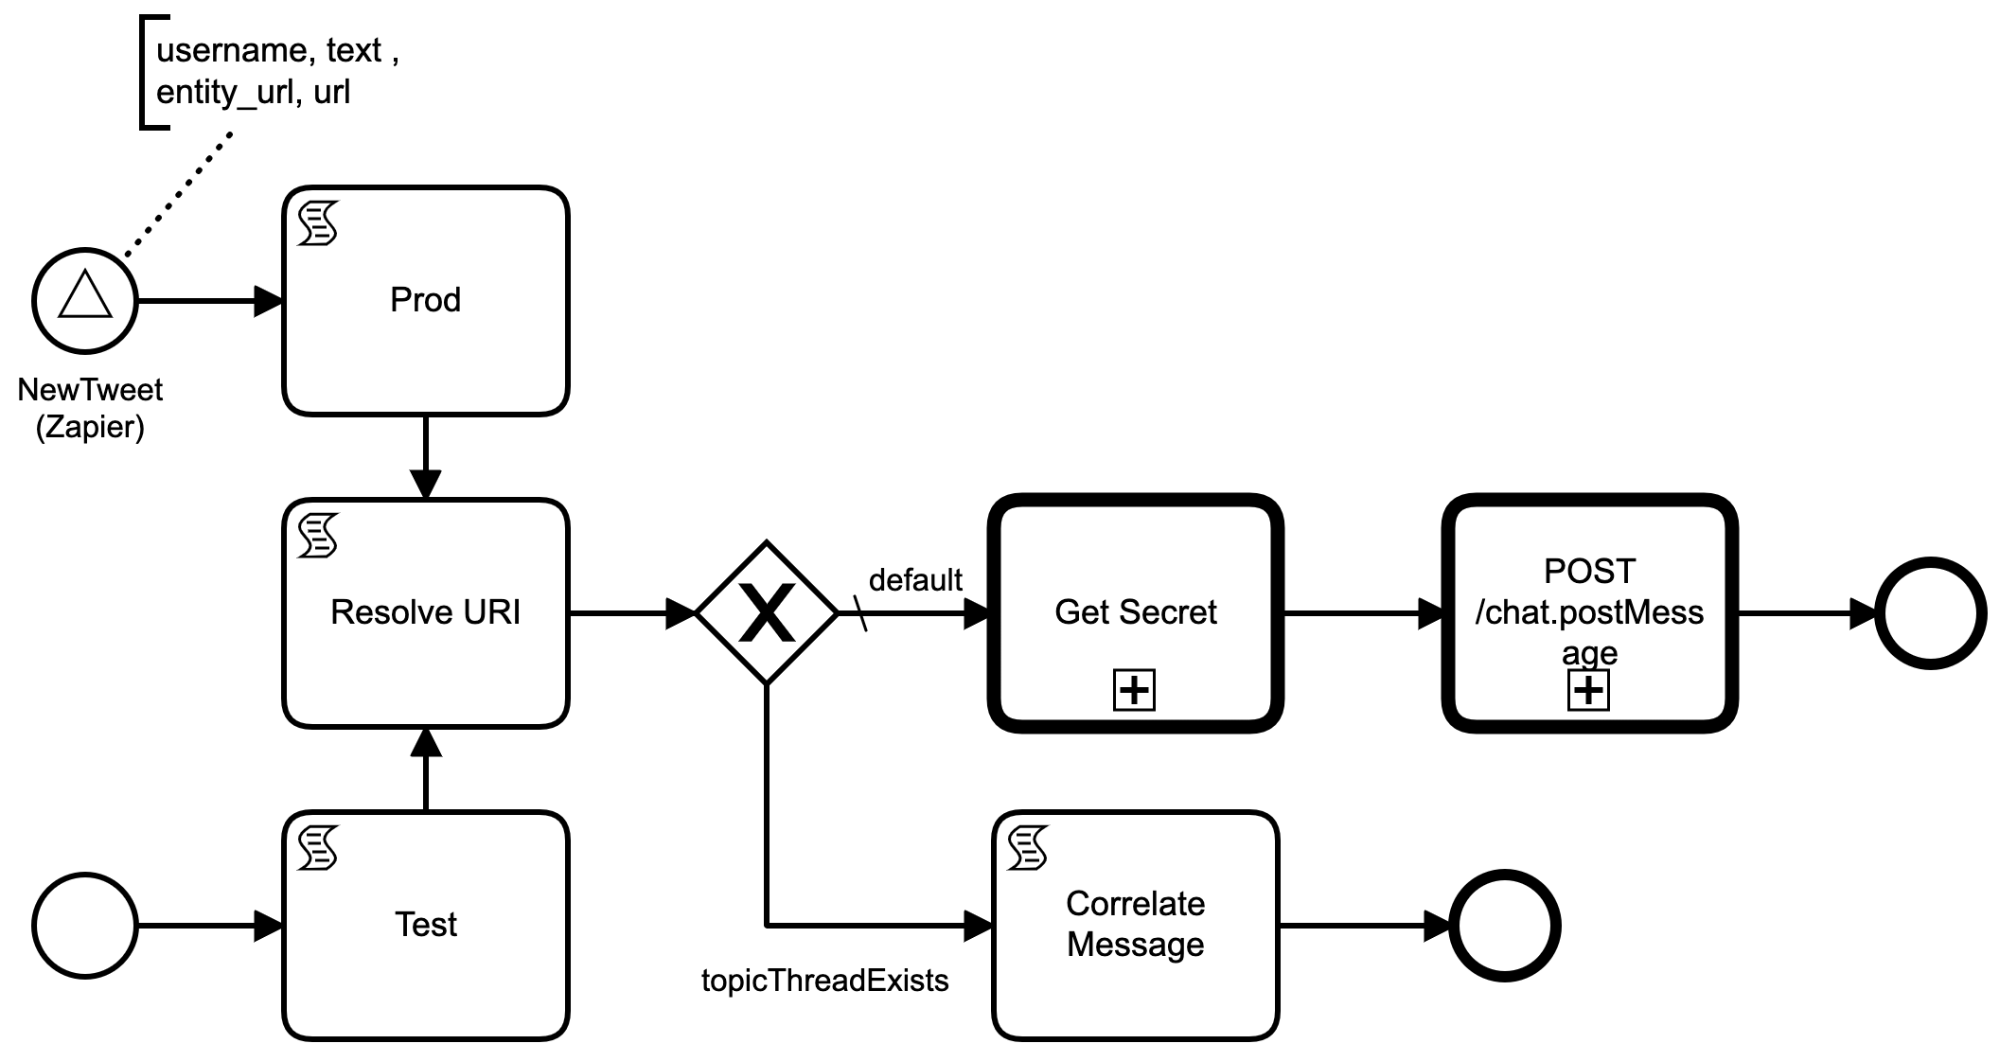
Long Running Content Workflow
Now we reach the core workflow. The core purpose is to help our content authors monitor and maximize the impact of their work. Our workflow does a few things
- Annonces that a new content was published in a new thread
- Updates that thread when 7 days have passed with a content report linked Google Analytics data
- Reminds the content writer after 3 weeks that it might be a good time to syndicate
- Updates the thread if a tweet is posted about it
The idea that we have a single thread per blog, which organizes useful activities related to that content in a single place.
Here is the workflow in its BPMN representation in all its glory, the full source including the scripts is available at on Github
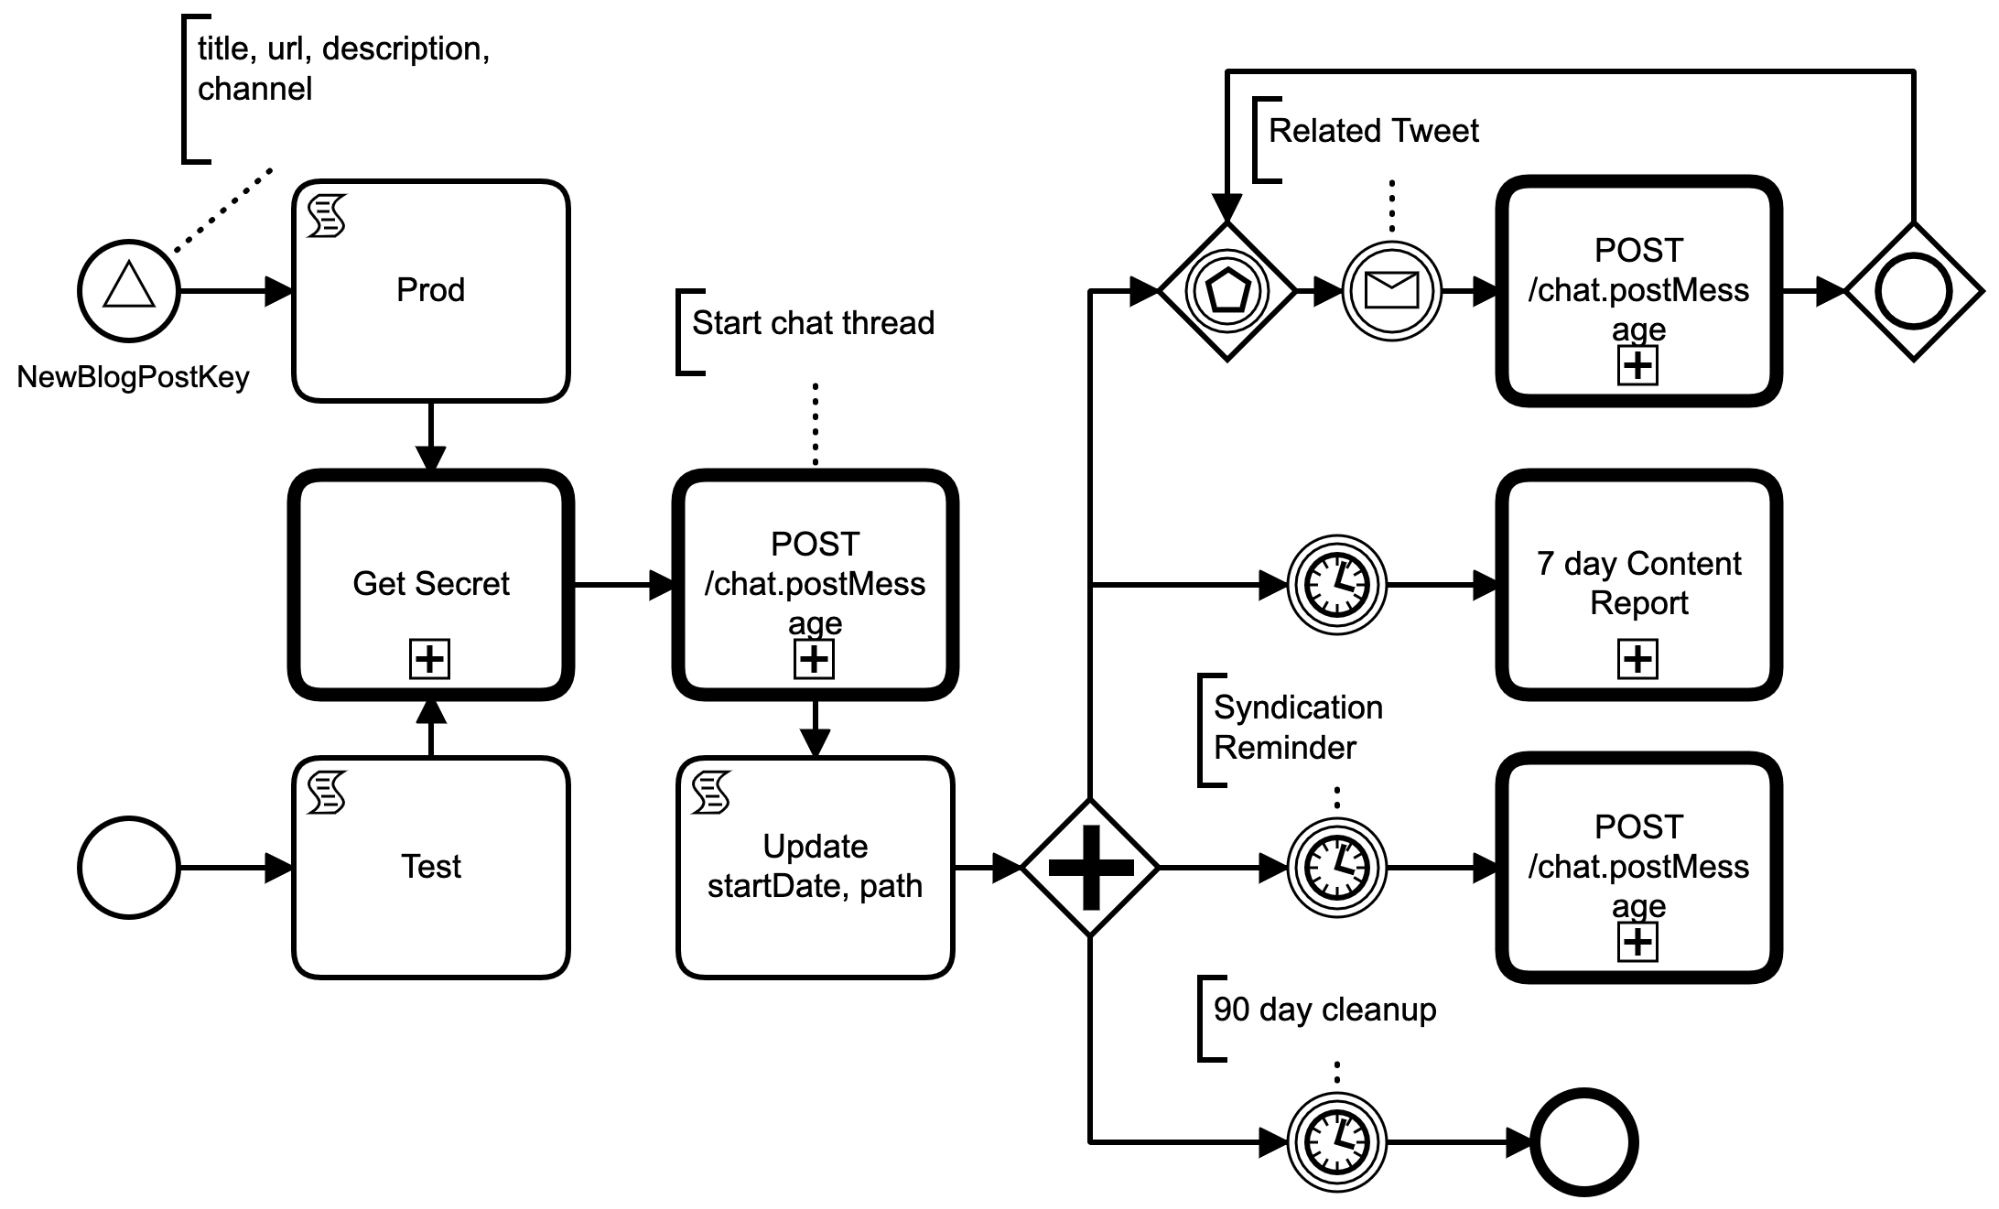
Like in the preparatory workflow, we have two entrance points, one for the event driven signal ultimately originating from Zapier, and the other for manual triggering.
Get Slack Secret
The first common step, Get Secret, retrieves a Slack bot's secret via a subprocess. This subprocess is two REST GET calls, one to the GCP local metadata server to get an access token, the second to Google Secret Manager to actually fetch the secret. Google Secret Manager base64 encodes the secret in the returned JSON payload, so we have to base64 decode it before writing the plain text secret to a variable secret (trivial to script in Groovy).
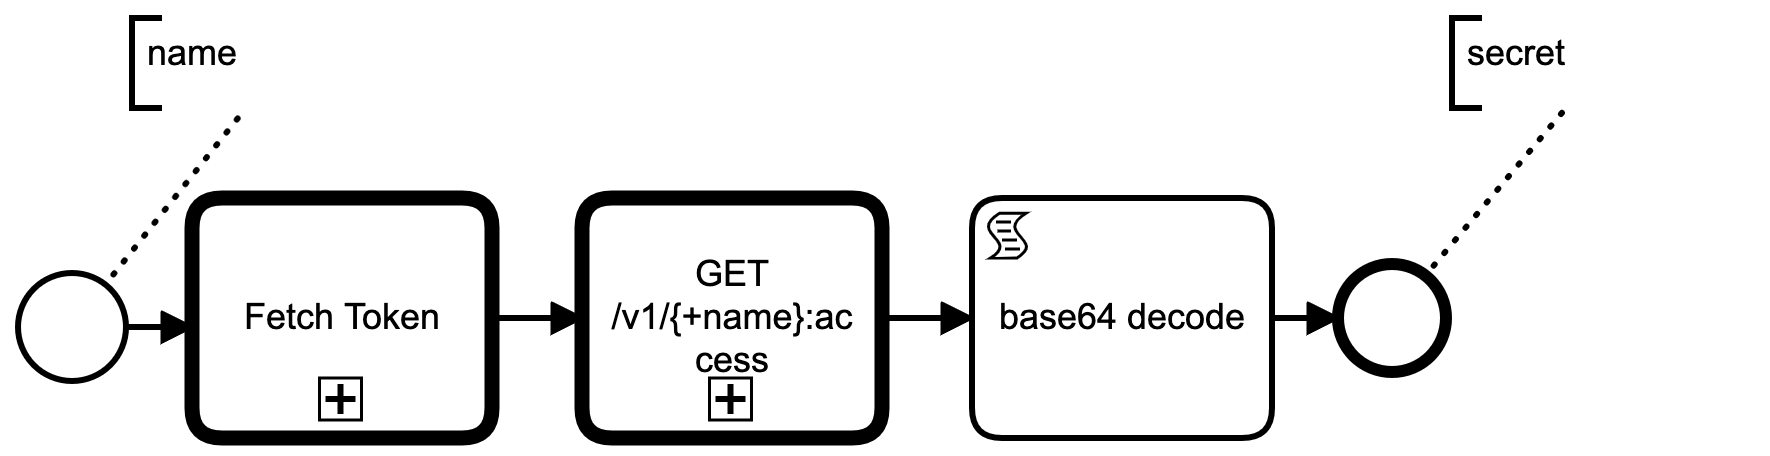
I used a code generator to produce BPMN element templates from OpenAPI endpoints specs, so all the variables to JSON marshalling and unmarshalling are handled automatically. See openapi2modeler.ts.
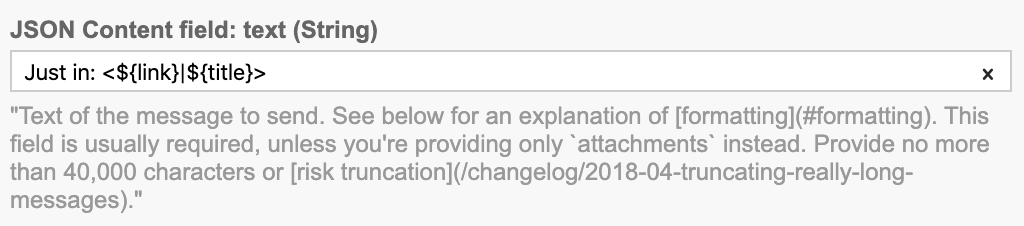
Start a Content Slack Thread
After obtaining a Slack secret, the next step starts a new chat thread in the passed in channel. Like most APIs Slack provides an OpenAPI specification so it's simply a matter of filling out the text, channel and token fields. Again, we used code generation for the marshalling. BPMN expression syntax is powerful enough for us to write our message inline using multiple variables
When its posted to Slack it renders like:
So the thread give the readers a link they can click on to take them to the original content. Slack's own UX unfurls the URL to render a preview of the content.
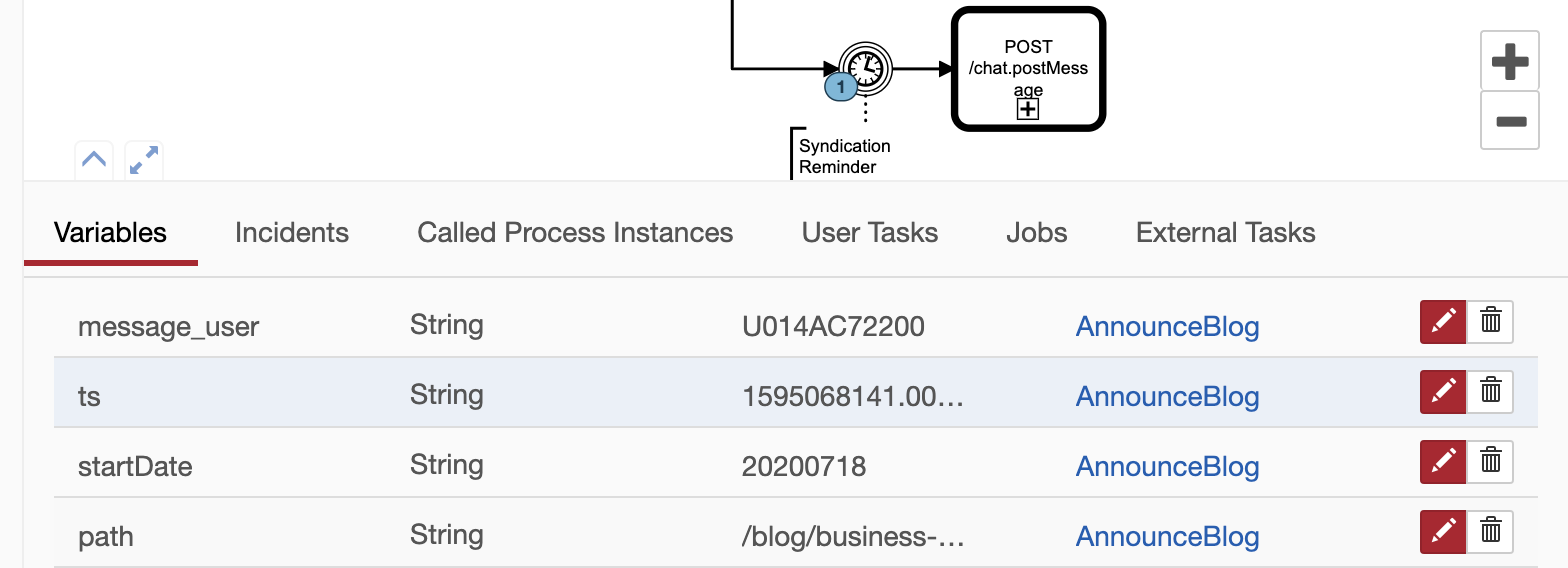
Slack responds to the REST call with a lot of data, but most relevant is the ts field which identifies the newly created thread. We unmarshall Slack's postMessage response and bind the ts to a process variable with the same name.

As a side note, all these variable values can be inspected at runtime graphically using the excellent Camunda Cockpit (and also programmatically via the REST API).
Reacting to Time and Events
After starting a Slack thread about a new content piece, we read the wallclock time and business key and put the startDate and URL path into variables for later.
At this point the content thread is setup! What happens next depends on external events. We split execution using a BPMN parallel gateway into 4 paths.
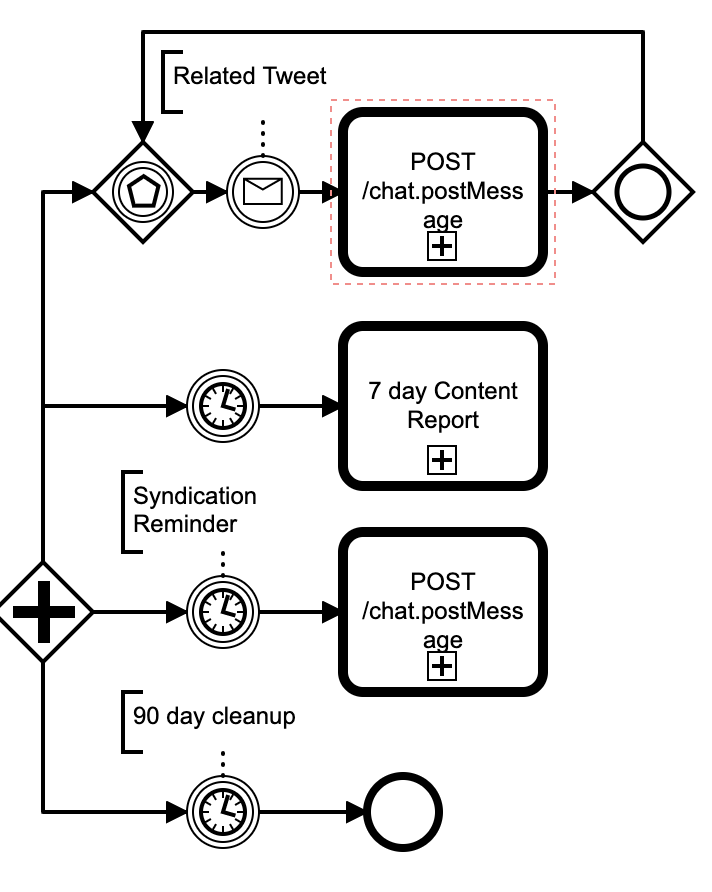
- Path 1: Create an event loop to update the thread of any related.
- Path 2: Wait 7 days and post a content report
- Path 3: Wait 3 weeks and post a reminder to syndicate
- Path 4: Wait 90 days and end the end workflow
I really like how trivial it is to wait for long periods of time in a BPMN process. Process state is committed to a relational store as the workflow executes, so the workflow engine can be restarted without losing progress. Infact, as we host the engine in a serverless container, our engine is frequently restarted.
The Event Loop
The event loop starts with an event-based gateway. This pauses execution until something external happens. In our case, we wait to catch a related tweet message. For our use case we want to signal that the Futurice marketing department tweeted something about the content piece.
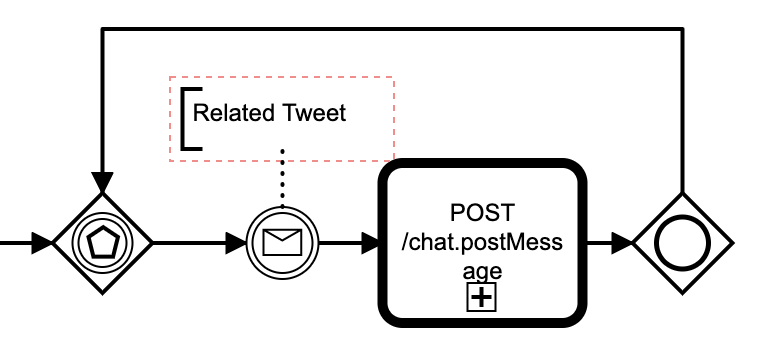
After a related tweet BPMN message we post a Slack message to the content thread, then merge execution to an inclusive gateway. The inclusive gateway is not really necessary when you have jsut one event, but it demonstates how to scale the event loop with lots of event types. Ultimately, after the tweet is processed we go back to the event gateway to wait for the next event.
Messages, unlike signals, are 1-to-1 interprocess communication mechanisms. Our Tweet message is thrown by different process that listens to Twitter.
Routing Related Tweet Messages to the Workflow
We use Zapier to listen to our public Twitter account (@futurice) and post a signal to our engine for every tweet that occurs. Another BPMN process, the TwitterRouter, listens to this signal and looks for content URLs in Tweet contents.
To see if a Tweet is related to a blog post, we look at the Tweet'a hypelinks. Annoyingly, Twitter automatically shortens URLs, so we follow the shortened URLs until they stop redirecting. This is scriptible using Java API and Groovy. Eventually, we can extract the URI, and sometimes this will match the business key of a running workflow.
After extracting the URI we make a decision based on a process query , filtered by business key. If we can find a process with a matching business key, we send a message to it. To aid debugging, we post non-matched Tweets to a debugging room in Slack (which I can manually verify that it's a true negative)
Full source is here.
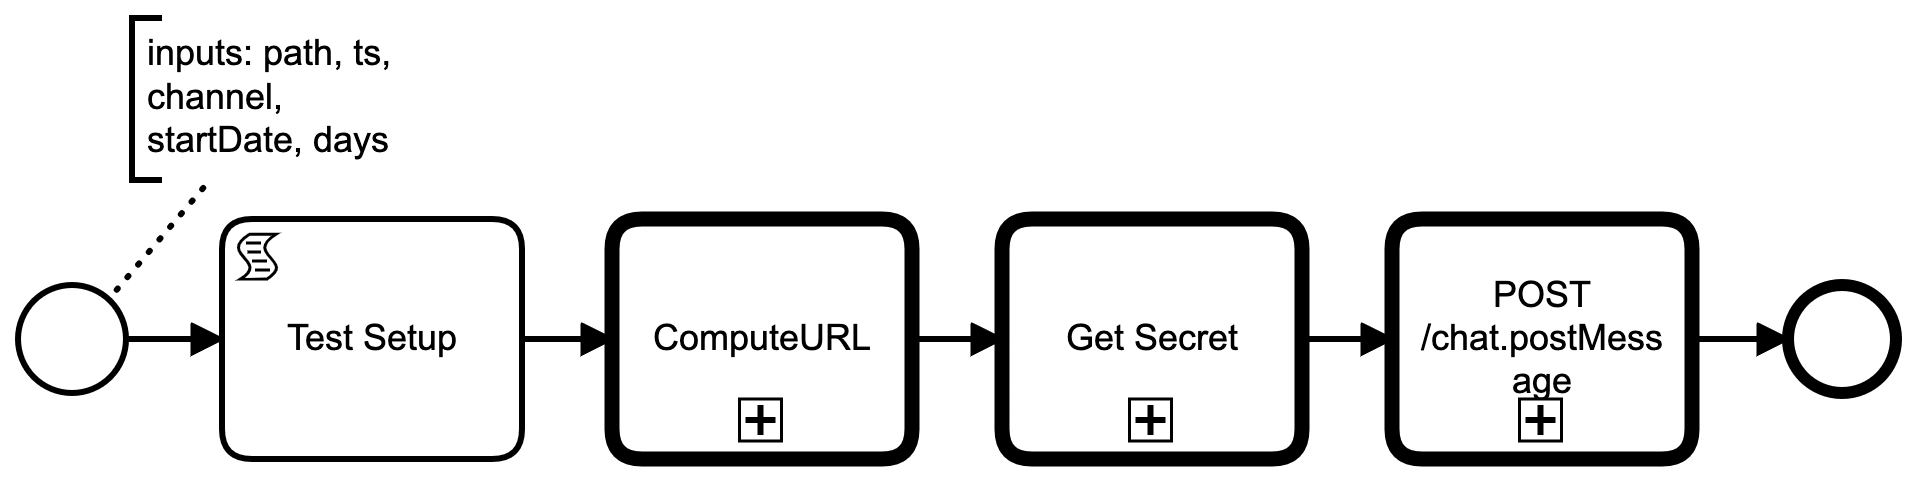
Generating a 7 day Content Report
One of the main features of the workflow is to provide simple analytics to the content writer. The actual implementation in BPMN is very simple, we post a dynamic link on our content thread which links to Data Studio.
It's simplicity exemplifies the power of the URL and having tools that really, and I mean really, understands the sanctity of the URL. Google, being a marquee web company, does URL based technology extremely well. A good web service will encode its state in the URL, so that when shared, the receiver will see the same view. We use this effect to create a URL that opens into a Data Studio Dashboard with the filters prefilled to the content piece and date range of relevance.
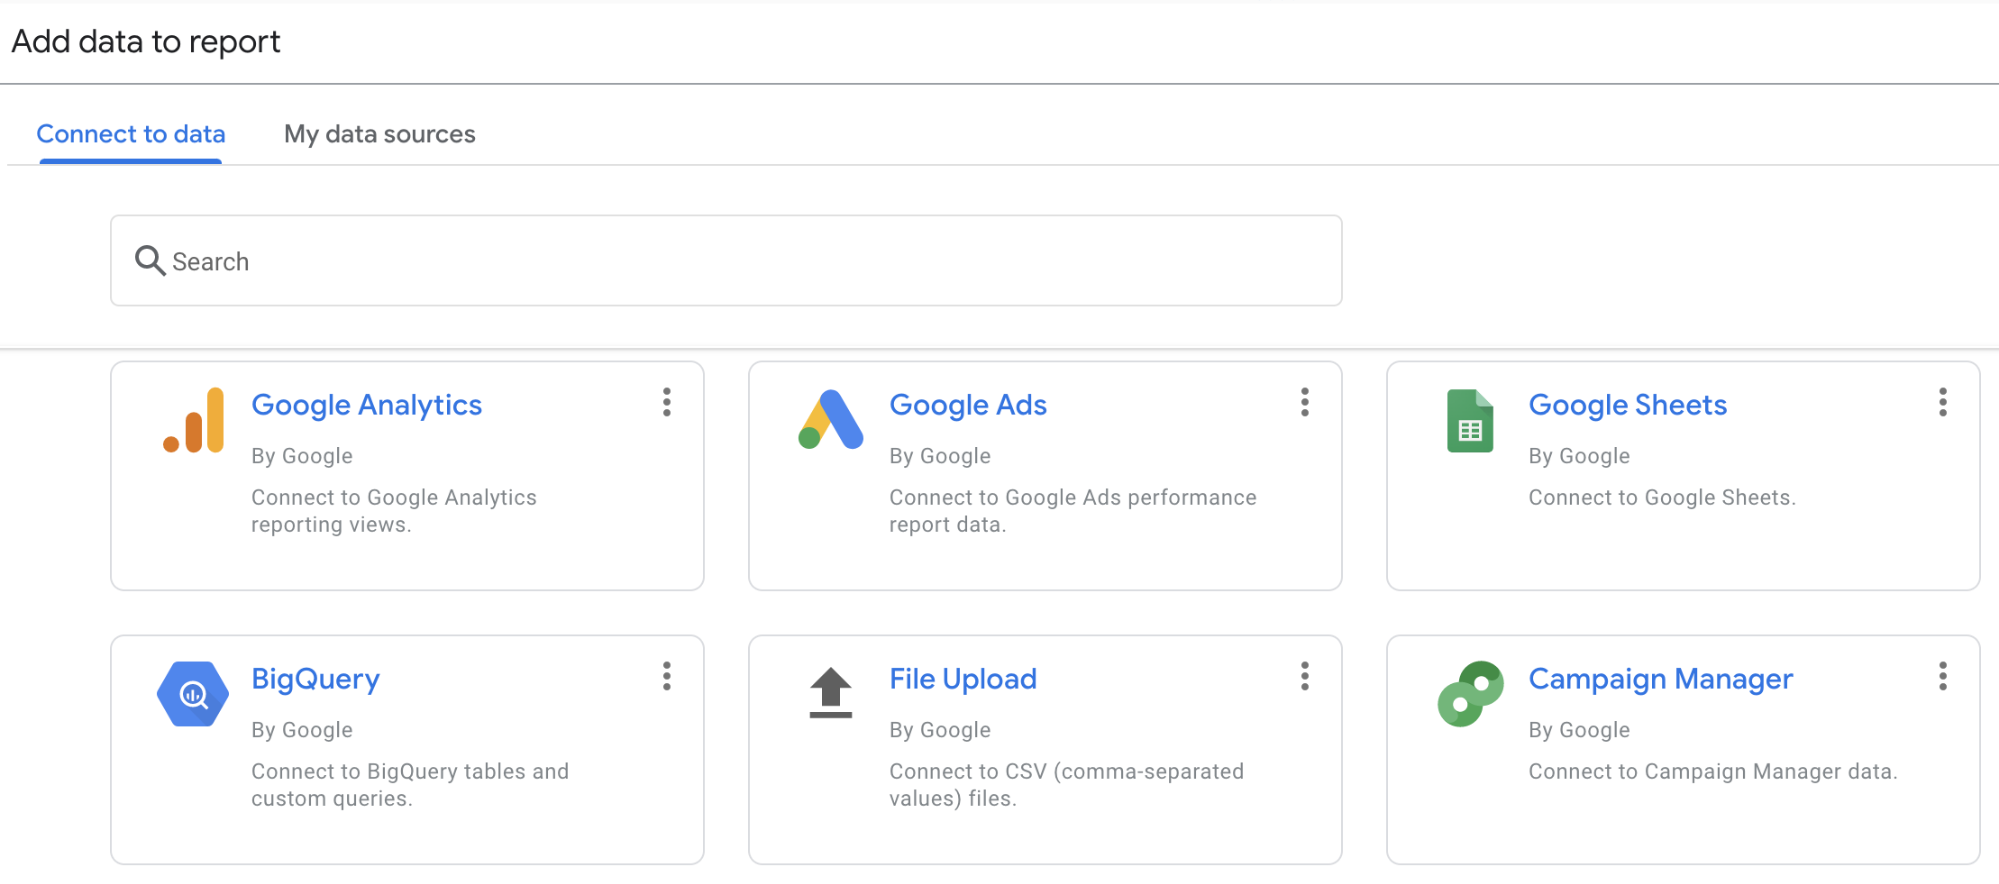
The first step is to build a general purpose dashboard that contains enough controls to summarize our Google Analytics data for any content piece at any point in time. Here are the broad steps to setup Google Datastudio.
Step 1: Connect a Data Source
Google Data Studio is a good example of a federated data technology. You don't need to copy data into it, it fetches on demand. So step one is to add Google Analytics as a data source it can pull from.
Step 2: Build the visuals you want
For blogging, the data of relevance included
- The drop off in reading over time (pageviews).
- A measure to see where people went after reading (the Exit page), to help answer whether it primarily helped with recruiting or customer acquisition?
- Finally where did the traffic come from (source/medium)?

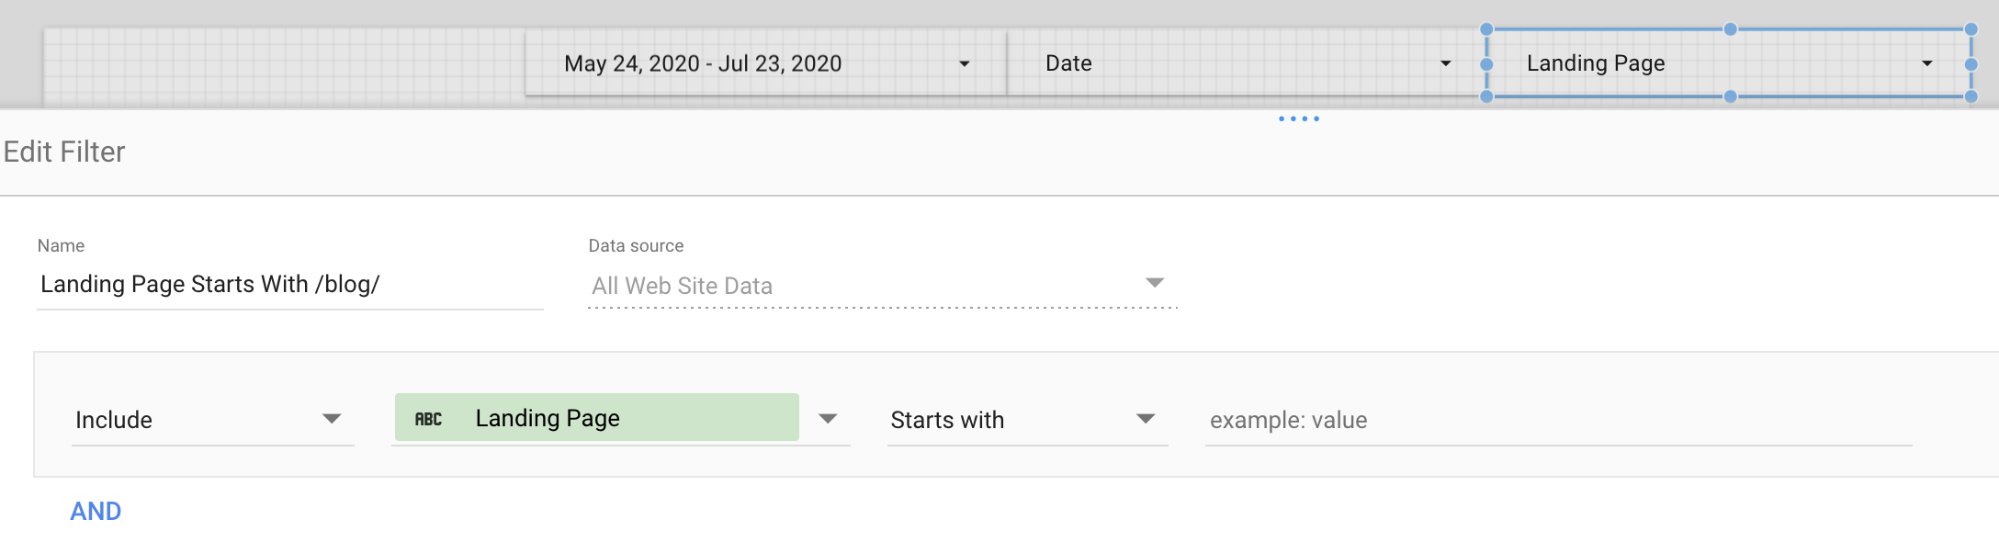
Step 3: Add data filters that will parameterize the dashboard
We wanted our dashboard to give a summary for a specific content over a specific time period. So I added a Landing Page startsWith filter and a Date filter. By using a filter control filter, you can have the Landing Page control provide data driven options and search, making it easy to discover the options without leaving the tool.
Step 4: Reverse Engineer the URL encoding.
Once you have a dashboard with controls, you will notice that as you configure the controls, the URL changes to include a params paramater. For instance, after seleting a landing page filter and some dates, our dasboard URL query parameter became:
params=%7B"df5":"exclude%25EE%2580%25800%25EE%2580%2580IN%25EE%2580%258020200526%25EE%2580%258020200527","df4":"include%25EE%2580%25800%25EE%2580%2580IN%25EE%2580%2580%252Fworking-at-futurice"%7DThe % character suggests that this is a URL encoded string, and after decoding it (e.g. with dencoder), it turns out to be a JSON payload
params={"df5":"include%EE%80%800%EE%80%80IN%EE%80%8020200526%EE%80%8020200527","df4":"include%EE%80%800%EE%80%80IN%EE%80%80%2Fworking-at-futurice"}I believe df4 and df5 keys are shorthand for "data filter 4" and "data filter 5". The values are still further encoded. %EE%80%80 is a three byte UTF-8 character: U+E000, which seems to be used as a field separator. Another round of URL decoding on df5's value yields
include#0#IN#20200526#20200527So now it's clear "20200526" refers to the dates picked. And decoding df4 yields
include#0#IN#/working-at-futuricewhich is clearly the landing page filter control value.
Now we understand how the params query parameter is encoded we can generate a URL that takes us to the dashboard, for a specific blog post, showing the data for the 7 days after it was published, just by manipulating the URL.
The Finished Application
Here is what an active content thread looks like in Slack. I really like the way passing around URLs between applications can unlock a powerful and informative workflow for very little effort. This is why it is important to find tools that understand URLs properly, they compose better.
The cost for hosting the application is extremely low. We do not publish a lot of Tweets or blogs so we could fit into Zapier's free plan. The Camunda binary is only spun up on demand using Cloud Run, and costs less than $0.01 a day to run. The biggest cost was the Cloud SQL database, but again, as the application was not particularly latency sensitive we could use the smallest db-f1-micro instance size at $9 per month. We also had to pay some storage costs but these were small. All-in-all, it costs less than $10 per month, (excluding Slack user subscriptions), which is truly remarkable value for such a general purpose and reliable system.
Experiences Gluing with Camunda
I definitely think glueing products together is the most cost effective method of creating value. It has helped us get more value out of our content production efforts, and more value out of the tools we already used. While many 3rd products have APIs, there is usually a high barrier to entry to using them effectively.
Camunda lowers the cost of automation significantly, by offering a solid runtime and workflow abstraction. Notable features are that it can be self-hosted in an isolated system at low cost. It has excellent monitoring tools, so a ton of work is taken care of out of the box. It's clearly been put together with reliability in mind, the fact it walks through processes via database transitions is top notch and makes long running processes trivial to implement.
Zapier complemented the setup well. It saved integrating directly with Twitter and running poll loops. Again, there is a ton of work we didn't have to do and it massively simplified the operations. When you use a solution like Camunda it becomes easier to integrate and get the most out of what is already out there.
The main source of frustration was programming mistakes caused by the dynamic scripting language. One bug was a numeric 7 got deserialized as the string "7", which ended up iterating much further than expected and was hard to track down. Weird stuff like that doesn't usually happen with static languages. This annoyance is magnified due to the difficulty of testing.
To run a workflow you need to upload it to an engine. I did not invest much in testing, but I think for consequential applications you would need to invest heavily in running local integration tests. There is no way this can ever be done fast, as temporal events are implemented via DB polling. That said, the engine's REST API is powerful, and pretty much everything can be automated, so I think a reasonable workflow is achievable, but something than requires dedicated resources to acheive.
When I look at the whole application as implemented, I would estimate that it's only about 50 lines of non-trivial code! The bulkiest parts were resolving and extracting the URI path from within Twitter API responses, and generating Data Studio URLs. Really it's astounding to me how little code is required to create high quality visualizations and UX workflows when you lean on 3rd party product APIs.
Technically, the bulk of the code is really in marshalling and unmarshalling API calls. I used a code generator for this, which saved a ton of tedious development iterations. This was also very useful for having the API descriptions within the Camunda tool, enabling in-tool discovery of functionality.
I wish a few other things could be typed. In particular, signals, messages and start/end events should probably have schemas too. They behave very similar to external REST calls and would benefit from code generated templates too.
Overall, the greatest thing about BPMN is that the process definition artifacts are both an amazing communication representation and an executable representation. The BPMN diagram view abstracts and explains the general idea at a block diagram level, yet when you click on the boxes, you expand to see the low level details. Furthermore, you can flip to the textual XML representation and manipulate in a code editor, then flip right back again to the graphical representation. The fluidity between graphical and textual is magnificent. The existence of graphical view leads to easy to write documentation. You can clearly see this was the purpose, as the BPMN has special labeling boxes to help guide understanding right within the diagram!
In summary, Camunda is a fantastic technology! Why not check it out yourself!
 Tom LarkworthySenior Cloud Architect